Using the Policy Builder
The Policy Builder is where you can manage your smart policies, including adding and editing data providers and checks as well as publishing new policy versions.
This topic refers to the new draft smart policies which are currently in testing with our feedback partners. If you're interested in becoming a feedback partner, get in touch with your Customer Success Manager.
Getting started with the Policy Builder
A smart policy is the combination of data providers and checks that can be used on your account.
Data providers are the third-party services to help you onboard customers, for example, Experian, Companies House, or Onfido.
Checks are automated processes used to replace manual work that would otherwise be needed to:
Get information from data providers, such as gather all company filings from a corporate registry; and/or
Perform actions using data providers, such as run an electronic identity check.
When you run a check from Passfort, the profile details are sent to the data provider, which performs the check and returns the result.
Choosing data providers and checks
Before you start building your smart policy, you should take some time to decide which checks you want to run and which data providers you want to use to run them.
To get a list of all the check types and the data providers for each one, see What are Passfort's checks?.
Each data provider has its own way of performing checks, which means the available configuration options depend on the data providers you choose. To learn more about the specific behavior of a provider, see its configuration information.
Once you know which ones you want to use, follow the steps in this topic to add your data providers and checks, then review and publish the smart policy.
Working with your environments
You'll be provided with two environments:
Demo environment: This is a special account just for testing. It does not run live checks, with the exception of ones that use free data providers like Companies House, so you can run as many tests as you like.
Production environment: This is the environment that your systems will use to run live checks. This means you'll see real check results from your data providers and you'll be charged for any checks you run.
We recommend building your smart policy initially in your demo environment where you can test every check and data provider combination, then replicating your configuration in the production environment.
Caution
If there are any differences between the configuration in your demo environment and production environment, your policy will behave differently. We recommend double-checking the configuration in your production environment before publishing the policy.
Running tests in your demo environment
Since live checks are not run with paid providers in the demo environment, Passfort provides a series of tests you can use to simulate these results. To get the tests:
Find the configuration information for your data provider.
In the topic, go to the section called "Testing your configuration." All the steps to run the tests are there.
You can combine test words into a single profile.
For example, if you're testing the Electronic identity check with Experian Prove-ID and the PEPs and sanctions screening with RDC, you could run these tests by creating profiles with the following names:
Test | Keywords required | Profile name for test |
What happens to customers with no PEPs matches and a 2+2 result? | To test no PEPs matches: No keywords are required To test a 2+2 result: No keywords are required | Alex Wheeler |
What happens to customers with no PEPs matches and a fail result? | To test no PEPs matches: No keywords are required To test a fail result: fail | Alex Wheeler fail |
What happens to customers with some PEPs matches and a 2+2 result? | To test some PEPs matches: PEP To test a 2+2 result: No keywords are required | Alex Wheeler PEP |
What happens to customers with some PEPs matches and a fail result? | To test some PEPs matches: PEP To test a fail result: fail | Alex Wheeler PEP fail |
This is only an example of a test you may want to run. See the data provider topics for more keywords you can use.
Some tests can return different results based on your configuration options. Every data provider topic includes a section called "Configuration options" which lists the options you can use for that check variant.
Running tests in your production environment
When you're happy with the behavior of your demo environment, you should replicate the exact same configuration in your production environment.
You may want to run tests on a small set of individuals, such as employees or family members, to make sure your checks have been configured correctly and your systems are integrated properly. Remember that you'll see real check results from your data providers and you'll be charged for any checks you run.
Caution
Before running any live checks on a real person, you must get their permission. Note that some checks, for example, the Electronic identity check, run a soft credit check and may appear on the person's credit report.
Data providers
Each instance of a data provider is considered a new data provider variant.
The variant is the combination of the data provider, check type, commercial agreement details, and configuration options.
It's possible to add multiple variants for the same provider.
To get a list of all the check types and which data providers you can use for each one, see What are Passfort's checks?.
Add a data provider
To add a new data provider variant:
Log into the Passfort portal and go to .
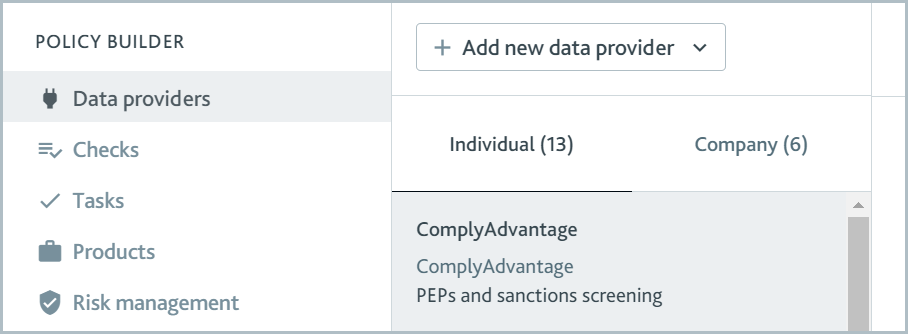
Select . A drop-down is displayed.
If the provider will be used to run checks on individuals, select . If the provider will be used to run checks on companies, select . The New provider dialog is displayed.
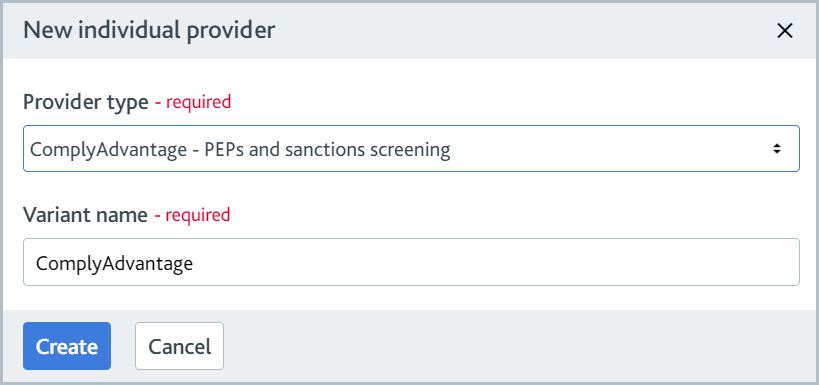
If the provider will be used to run checks on individuals and companies, you should add two variants - one as an Individual provider and one as a Company provider.
For the Provider type, select the provider name and check type. If the provider supports multiple check types, it will be listed multiple times in the drop-down.
For the Variant name, type a name for this configuration. Users will see this name in the portal.
Select . The provider variant is added to the data providers list and the variant details are displayed.
Once you add a new variant, a banner is displayed at the end of the page to show which version of the draft policy this will be added to. To learn more, see Review and publish the draft policy.
Complete any other information in the Commercial agreement section.
To learn more about your commercial agreement details, please contact your data provider account manager.
In the Configuration options section, select the options you would like to use for this variant. To learn more about configuration options, see the configuration article for your data provider.
The data provider topics list all configuration options in Configuration option sections, including those for check variants. If you read about a configuration option that isn't displayed in the data provider variant, you'll have the opportunity to configure it later when you set up the check variant.
All changes are saved in real time to the latest version of your draft policy.
Edit a data provider
To edit an existing data provider variant:
Log into the Passfort portal and go to .

By default, the data provider variants for individuals are displayed. To see the variants for companies, select .
Select the name of the data provider variant. The variant details are displayed.
Edit the details. Your changes are saved automatically to the latest version of your draft policy.
Delete a data provider
To delete an existing data provider variant:
Log into the Passfort portal and go to .

By default, the data provider variants for individuals are displayed. To see the variants for companies, select .
Select the name of the data provider variant. The variant details are displayed.
Select . A confirmation message is displayed.

If the button is grayed out, it's because the data provider is currently in use on another check. Hover your cursor over the button to see which check it's used on, then edit the check to remove the data provider from the list.
Click . The data provider variant is removed from the current version of your draft policy and is no longer displayed in the data providers list.
Checks
As with data providers, each instance of a check is considered a new check variant.
The variant is the combination of the check type and configuration options as well as the data provider variants used to run the check.
It is possible to add multiple check variants for the same check type.
To get a list of all the check types and which data providers you can use for each one, see What are Passfort's checks?.
Add a check
To add a new check variant:
Log into the Passfort portal and go to .
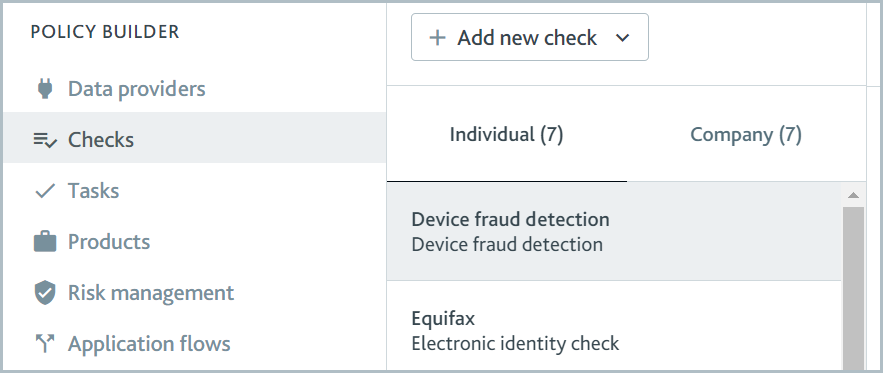
Select . A drop-down is displayed.
If the check will be run on individuals, select .
If the check will be run on companies, select . The New check dialog is displayed.
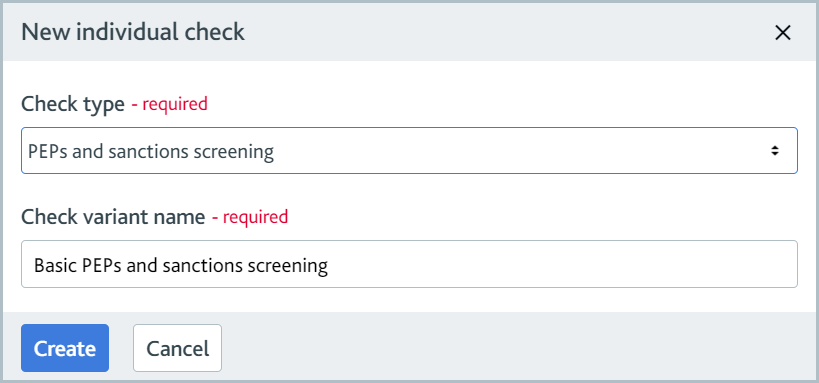
If the check will be run on individuals and companies, you should add two variants, one as an Individual check and one as a Company check.
For the Check type field, select the type of check.
For Check name, type a name for this variant. Users will see this name in the portal.
Select . The check variant is added to the checks list and the variant details are displayed.
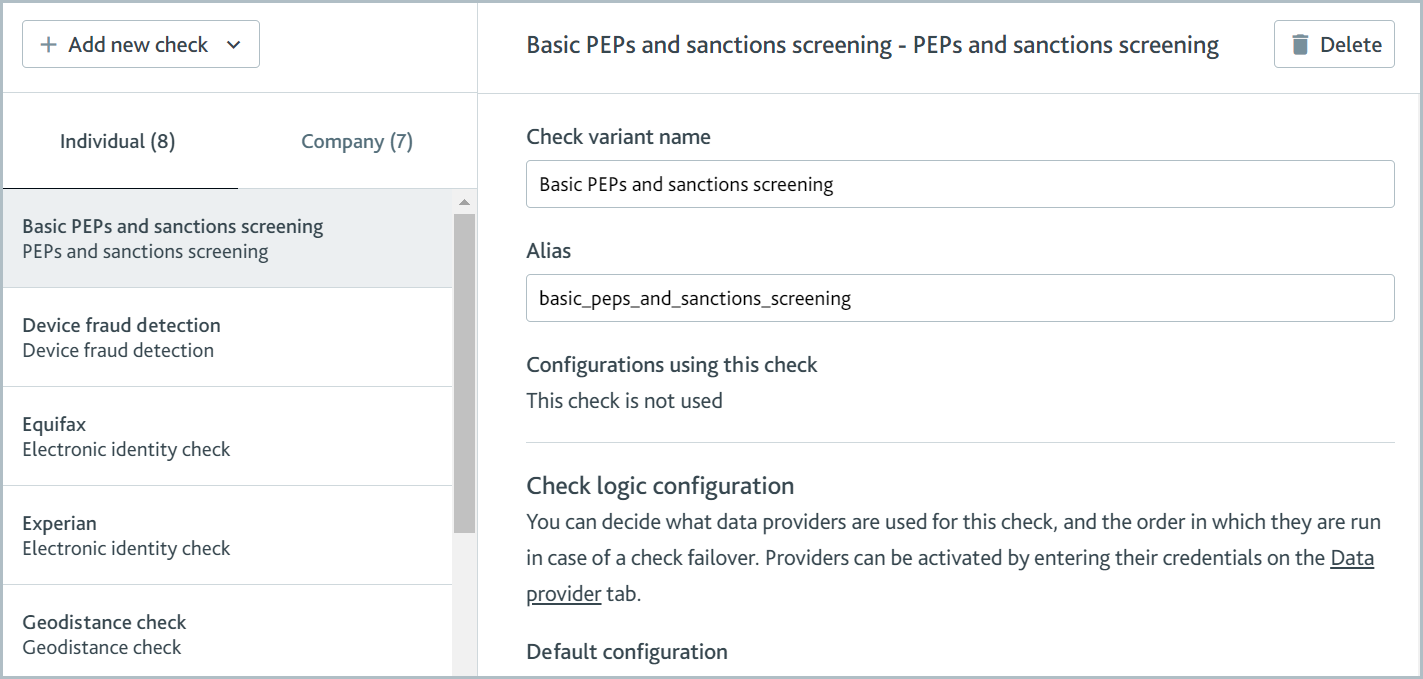
Optionally, for the Alias, write a name that will be used when making calls to the API. The name should not include any spaces, for example, "basic_peps_and_sanctions_screening." Learn more about aliases.
If you are adding a company check, select the option if you want to use the data providers configured here for the company search in the Add a new profile dialog.

This option is available for either a company data check or a company registry check.
In the Check logic configuration section, select . A drop-down is displayed with the name of every data provider variant that matches the check type.
Select one or more data providers from the list. The data providers are displayed in the Order priority of check providers section.
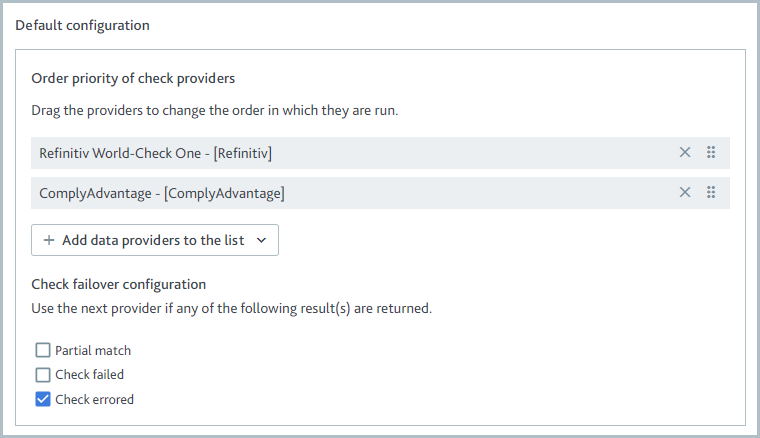
If you add more than one data provider variant, the first variant in the list will be tried first when the check is run. If the check does not pass with the first variant, the next variant in the list is tried, and so on. This behavior is called waterfalling.
To change the waterfall order, select the Reorder
 icon next to the provider and drag the provider into the new position.
If the expected check outcome is more complex than Pass/Fail, as in the case of a PEPs and sanctions screening, an additional section is displayed called Check failover configuration. This section determines which result will cause the next data provider variant to be tried.
For example, in this case, Refinitiv World-Check One will be tried first. If the check errors, ComplyAdvantage will be tried. If Refinitiv World-Check One returns any other match, including a full match, a partial match, or a failed match, the waterfall will stop and ComplyAdvantage will not be tried.
To use specific data providers based on the profile's country:
In the Country-based configuration section, select .
If the check is for individuals, for Country of residence, enter the name of a country.
If the check is for companies, for Country of incorporation, enter the name of a country.
Select and select one or more data provider variants that match the check type. For more information about selecting data provider variants and configuring the waterfall, see step 10. To add specific data providers for another country, follow these steps again.
To remove an entire country configuration, select .
Edit a check
To edit an existing check variant:
Log into the Passfort portal and go to .

By default, the check variants for individuals are displayed. To see the variants for companies, select .
Select the name of the check variant. The variant details are displayed.

Edit the details. Your changes are saved automatically to the latest version of your draft policy.
Delete a check
To delete an existing check variant:
Log in to the Passfort portal and go to .

By default, the check variants for individuals are displayed. To see the variants for companies, select .
Select the name of the check variant. The variant details are displayed.
Select . A confirmation message is displayed.

Select . The check variant is removed from the current version of your draft policy and is no longer displayed in the checks list.
Policy versions
A smart policy is the combination of checks and data providers that can be used on your account.
When you first add data providers, decision reasons, and checks, a new draft smart policy is created automatically so your changes are saved.
You can keep editing until you're ready to publish the policy version. Once the policy version is published, you'll be able to use the data providers and checks.
If you want to make changes after your smart policy is published, a new draft will be created again automatically as soon as you start making changes. When you publish the new version, it becomes the active policy version and the other version is archived.
Even if you have many policy versions, there will only ever be one active policy version and one draft policy version. All other versions are archived.
See policy versions
To see all versions of your policy, go to .

All policy versions are displayed:
Draft policy: If available, your draft policy is displayed at the beginning of the list and listed as draft.
Active policy: If available, your active policy is displayed directly following the draft policy and listed as live. If you don't have a draft policy, it's displayed at the beginning of the list.
Archived policies: Archived policies are displayed following the active policy.
The columns in the table show the following information:
Version name: The name of the policy version. This is created automatically.
Published by: The name of the user who published the version. In the case of the draft policy, there is no publisher as the draft isn't published.
Updated on: The date when the policy version was published. In the case of the draft policy, this shows when the draft was last updated.
Review and publish the draft policy
To review and publish the draft policy:
Go to .

Select the draft policy name in the Version name column. The policy details are displayed.
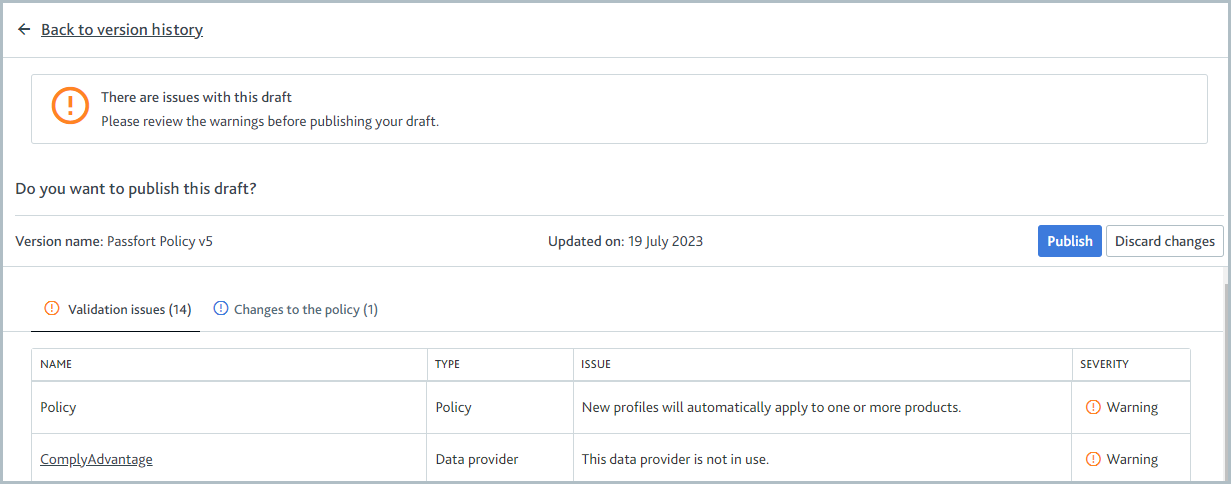
You can also get here by selecting in the banner that's displayed on each page in the Policy Builder when you make changes to data providers and checks.
If there are any issues with the draft:
A message is displayed to let you know the current state of the policy: You can't publish this draft or There are issues with this draft.
A Validation issues section is displayed near Changes to the policy so you can review each issue.
If there are any issues with the Error severity, you must resolve them now. If there are any issues with the Warning severity, you should review them, but you don't have to take action. If there are no issues, the Validation issues area is not displayed and no action is needed.
Select and confirm that these are the changes you would like to make.
When you're ready to publish your draft, select . The published policy is displayed at the beginning of the list of policy versions.
Discard the draft policy changes
To discard all changes to your draft policy:
Go to .
Select the draft policy name in the Version name column. The policy details are displayed.

Select . A confirmation message is displayed.

Select . The draft policy is removed from the list of policy versions.