Requesting information from customers
Use the button to send an email request to the customer and ask them to complete one or more forms.
Forms can be used to:
Collect information about the customer.
Collect a document to run a check.
Which tasks have the button? This is set up in the task configuration. Contact your account administrator to learn more about your configuration. All tasks that can be configured with forms are listed.
If you're an account administrator and want to configure customer requests, contact us and we'll help you get started.
Submit a customer request
Go to a task that has a button. The presence of the button means at least one form associated with that task can be added to the request.
To add the form to the request, select .

A button is displayed with the profile name.
If you would like to send forms associated with more tasks, go to those tasks and select .
Select the button in the task.
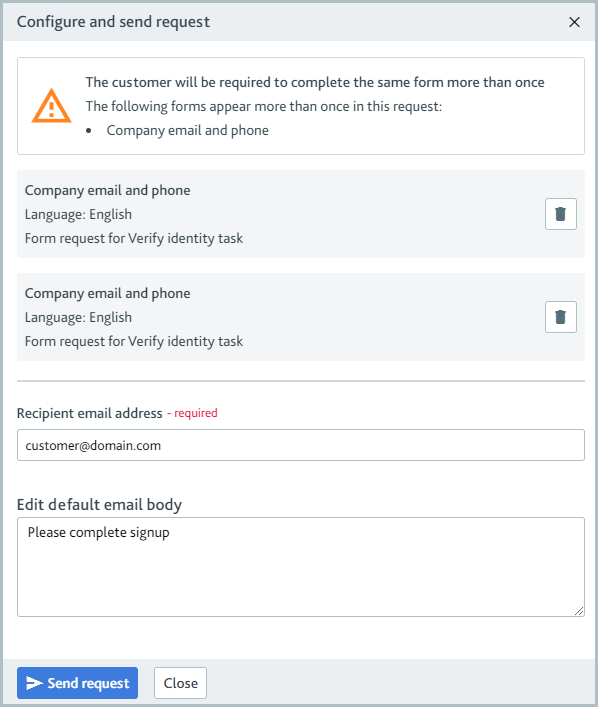
The Configure and send request dialog is displayed, showing your document requests. Although you don’t need to take any action, if you are sending more than one of the same form, a warning appears that tells you which form is duplicated.

Only one request email can be sent to the customer at a time, so it's a good idea to ensure the request you're sending now includes all the forms you plan to ask for.
To remove a form from the request, select . To add more forms, select , then go to the relevant tasks and select again.
If the profile has an email address in their Profile data, it's displayed in Recipient email address. If there's no recipient email address, add one.
Optionally, edit the email text shown in the Edit default email body field.
The email subject line, title, and sender address are also determined by your configuration. Contact your account administrator to learn more.
Select the button. The following happens:
The customer receives an email with a link to take them to the webpage where they can complete the forms.
The profile's Audit log is updated with a new Forms item to show the request has been sent.
The profile's application status becomes Waiting for customer.
After the customer adds their information, it's imported directly to the task. If the information is a document for a check, the check is run automatically.
After creating the request for information, you can set up email reminders at a specified frequency so that customer is notified of their outstanding request for information.
Note
Customer requests can only be sent from an incomplete task. Once a task has passed or failed, the Request from customer button is disabled.
What customers experience
When you send a request to a customer, they'll receive an email with a button prompting them to complete the forms.
The email will have the layout shown here, but the colors, logo, and text can be customized for your company with the help of Support.
Note
Forms remain valid for 90 days after the email is sent.
When the customer selects the button in the email, they're redirected to a webpage with one section for every form you've requested.
If the link has expired, you've canceled the request, or the customer has already completed the request, the page they're redirected to says, "This request has expired."
To complete a section, they should select it and add their information as prompted.
When they've completed all sections, they can select . When they select it, they'll see a notification that says "Data successfully submitted."
Cancel a customer request
To cancel a request for a form that you've sent:
Go to the task associated with the form. A customer request banner is displayed.

Select .
The customer will still have the old email request in their inbox. If forms in the request have not been canceled, when they follow the link in the email, they'll see those forms; canceled forms will not be displayed. If all forms have been canceled, when they follow the link, they'll see a message saying, "This request has expired."
Send a new customer request
If the link in the request email has expired or if the form request has been canceled, you can send a new customer request by selecting the button again.
It is not possible to send new customer requests when there are any form requests outstanding. If you would like to send a new customer request, locate the tasks with outstanding requests and cancel all the other requests.
You can also check the profile's Audit report to see which customer requests have been sent. Requests are logged as Forms items.