Add a profile
Each profile represents an applicant or customer going through your onboarding and monitoring processes.
There are two profile types: individual profiles, which are used for people, and company profiles, which are used for companies.
The profile’s type determines the kind of details stored about the customer/applicant, the type of tasks the profile's product applications can have, and the type of checks that can be run on its product applications.
Add an individual profile
From the Profiles page, select the button.
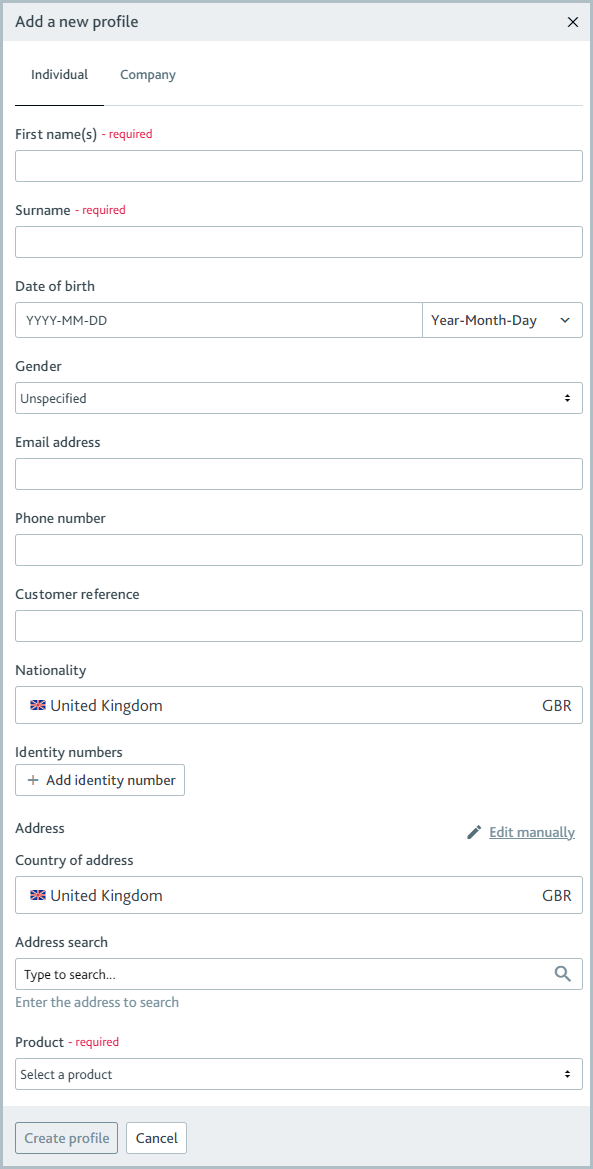
The Add a new profile dialog is displayed, showing the Individual tab.

In the First name(s) field, enter the individual’s first name and any middle names.
In the Surname field, enter the individual’s last name.
Add the individual’s date of birth:
By default, the date of birth includes the year, month, and day. To choose a different format, select and choose either or from the drop-down provided.
Select the field and use the calendar to choose the individual’s date of birth.
Optionally, complete the following fields:
Set the individual’s gender as male or female, select the drop-down, and select your option. If you leave the option as Unspecified, no information about the individual’s gender is displayed in the portal.
Add the individual’s email address to the Email address field.
Add the individual’s phone number to the Phone number field.
Add a customer reference to the Customer reference field. A customer reference can be used for any information you'd like to reference. It may also help locate the profile later.
Add the individual’s nationality:
Start entering the name of the associated country into the Nationality field.
Click the country when it’s displayed.
Add one or more identity numbers, such as national ID or passport. To do so, repeat these steps for each one:
Select number. The ID type and Issuing country fields are displayed.
Select the ID type from the drop-down.
Start typing the name of the associated country into the Issuing country field and select the country when it’s displayed.
In the Document number field, add the associated document number. If you leave this field blank, no information about the identity number is displayed in the profile.
Select the button to remove an identity number after you’ve added it.
To add a country of address, use the address search or enter the address manually:
To use the address search, start entering the name of the associated country into the Country of address field and select the country when it’s displayed.
Next, start entering the address into the Address search field and select the address when it’s displayed.
Select a product for the individual’s product application from the Product drop-down. Only one product can be selected at this time. You can add more product applications to the profile after it’s created.
Note
The product application will be permanently associated with this individual.
Select . The new profile is created, and the onboarding process begins. A confirmation message is displayed.

You can select the button in the message to view the profile now or close the message to continue working on the Profiles page.
You can add or change the individual’s details by editing the profile data.
Add a company profile
When you add a company, you can search for it, or you can enter the company data manually.
Search for a company
From the Profiles page, select the button.
The Add a new profile dialog is displayed, showing the Individual tab.
Select the tab.

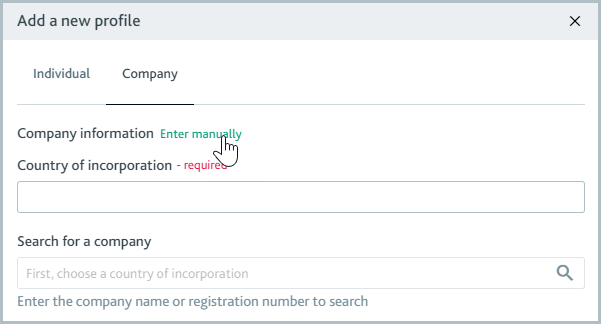
In order to search for a company, you first need to select a country from the Country of incorporation drop-down. To do this, enter the name of the country where the company is incorporated and select the country when it’s displayed.
In the Search for a company field, enter the company’s name and select the name when it’s displayed. Information available for the company is added to the company data fields automatically.
Note
If you see an error message that says, "No check variant found with company search enabled," make sure that either the Company data check or the Company registry check is set up as a default check.
In the Company name field, ensure the company’s name is correct.
Add the company number to the Company number field if there isn’t one.
Note
The only information required to create this profile is the company’s country of incorporation, name, and number, plus one product for the product application.
Optionally, review and, if required, edit the following fields:
Add the company’s email address to the Email address field.
Add the company’s phone number to the Phone number field.
Add the company’s website to the Website field.
Select the Incorporation date field to add the company’s date of incorporation.
Select an option from the Entity type drop-down to add the company’s entity type, for example, association, partnership, trust, and so on. Note that if the entity type is listed as Not known, no information about the entity type is displayed in the profile.
To add the company’s shares type, select Publicly traded or Private from the Shares options. Note that if the shares type is listed as Not known, no information about the shares type is displayed in the profile.
Add the company’s liability type by selecting Limited or Non-limited from the Liability options. Note that if the liability type is listed as Not known, no information about the liability type is displayed in the profile.
Add the customer reference to the Customer reference field. A customer reference can be used for any information you'd like to reference. It may also help you locate the profile later.
Add the company’s Legal Entity Identifier to the Legal Entity Identifier (LEI) field.
Add a tax identification number (TIN):
Click .
Select the TIN type from the Type drop-down.
Enter the TIN identification number into the Identification number field.
To remove an existing TIN, click the button.
Add a company address by using the address search or by completing the fields manually:
To search for an address, start entering the associated country into the Country of address field and click the country when it’s displayed. The country of address should not be No State / XXX because this code refers to persons of unspecified nationality and should only be used with individual profiles.
Next, type the address into the Address search field and click the address when it’s displayed. Optionally, use the Type of address drop-down to specify what kind of address this is, for example, head office address, branch address, or another address type.
To enter an address manually, click and complete the fields as required. Optionally, use the Type of address drop-down to specify what kind of address this is, for example, head office address, branch address, or another address type.
Tip
Multiple addresses can be added to a company via the API.
Select a product for the company’s product application from the Product drop-down. Only one product can be selected at this time. You can add more product applications to the profile once it’s created.
Note
The product application will be permanently associated with this company.
Select . The new profile is created, and the onboarding process begins. A confirmation message is displayed.

You can select the button in the message to view the profile now or close the message to continue working on the Profiles page.
At any time, you can add or change the company’s details by editing the profile data.
Enter the company data manually
From the Profiles page, select the button.
The Add a new profile dialog is displayed, showing the Individual tab.
Select the tab and then select .

The fields for manual data entry are displayed.
In the Country of incorporation field, enter the name of the country where the company is incorporated and select the country when it’s displayed.
In the Company name field, enter the company’s name.
Add the company number to the Company number field.
Note
The only information required to submit this profile is the company’s country of incorporation, name, and number, plus one product for the product application.
Optionally, complete the following fields:
Add the company’s email address to the Email address field.
Add the company’s phone number to the Phone number field.
Add the company’s website to the Website field.
Select the Incorporation date field to add the company’s date of incorporation.
Select an option from the Entity type drop-down to add the company’s entity type, for example, association, partnership, trust, and so on. Note that if the entity type is listed as Not known, no information about the entity type is displayed in the profile.
To add the company’s shares type, select Publicly traded or Private from the Shares options. Note that if the shares type is listed as Not known, no information about the shares type is displayed in the profile.
Add the company’s liability type by selecting Limited or Non-limited from the Liability options. Note that if the liability type is listed as Not known, no information about the liability type is displayed in the profile.
Add the customer reference to the Customer reference field. A customer reference can be used for any information you'd like to reference. It may also help you locate the profile later.
Add the company’s Legal Entity Identifier to the Legal Entity Identifier (LEI) field.
Add a tax identification number (TIN):
Click .
Select the TIN type from the Type drop-down.
Enter the TIN identification number into the Identification number field.
To remove an existing TIN, click the button.
Add a company address by using the address search or by completing the fields manually:
To search for an address, start entering the associated country into the Country of address field and click the country when it’s displayed. The country of address should not be No State / XXX because this code refers to persons of unspecified nationality and should only be used with individual profiles.
Next, type the address into the Address search field and click the address when it’s displayed. Optionally, use the Type of address drop-down to specify what kind of address this is, for example, head office address, branch address, or another address type.
To enter an address manually, click and complete the fields as required. Optionally, use the Type of address drop-down to specify what kind of address this is, for example, head office address, branch address, or another address type.
Tip
Multiple addresses can be added to a company via the API.
Select a product for the company’s product application from the Product drop-down. Only one product can be selected at this time. You can add more product applications to the profile once it’s created.
Note
The product application will be permanently associated with this company.
Select the button. The new profile is created, and the profile’s onboarding process begins. A confirmation message is displayed.

You can select the button in the message to view the profile now or close the message to continue working on the Profiles page.
At any time, you can add or change the company’s details by editing the profile data.